Thursday, February 28, 2013

Insetting Headstock

Hey folks,

I know it has been awhile since my last posting, it has been hectic around here.  So this post will be about insetting the headstock that I welded earlier in the project. I have also been up to a lot of test, lets just say Plyboo bent laminations.  Below are some pictures of the process:


Here is the template traced out onto the Plyboo pieces


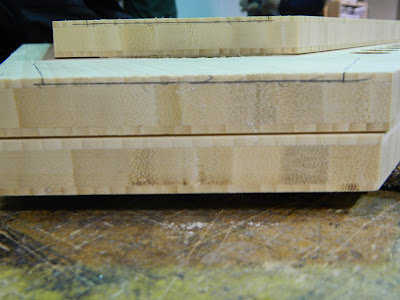
Here is the amount that will be taken off each piece

I then set up a router and cut the shape into each side of the Plyboo sheet

I dont have a picture of what the pieces looked like after completed, but they looked great! 

Until next time,
-Nick


Monday, February 18, 2013

Lots To Talk About!!!


Howdy folks,

So I have a lot to talk about! Building has began, and everything is starting to come together.  Sorry it has been a few days since I posted on here, just have been busy. So first to talk about is that my Plyboo has arrived, and metal pipe for the rear dropouts, exciting news right?

2 Plyboo Sheets
I then traced out all the pieces in need for the frame.


It is kind of hard to see, but I traced the pieces out from the template

Next, I cut about a 4 foot section off where the templates where, and then cut them on the out on the bandsaw.


So there is the overall shape of the bike, I think it looks pretty neat. After the initial cutting out I next started to lighten the inside pieces of the frame.


As you can see I cut holes into the frame to lighten up the material so the bike wasn't so heavy.


Last, I cut the center out of the frame.  Also, you can see that I cut off the the spot where the seat post will mount to the bike, I will insert it into the frame itself. 

So, you can see that I got a lot done.  I also got news that my actual bike parts are in, so tomorrow will be a really interesting post.  Until tomorrow, have a good one!

-Nick


Monday, February 11, 2013

Parts Have Arrived!

Hi All,

Today has been a very exciting day, parts have arrived and building has began! Whoop whoop! In all seriousness it is great to finally get building.  The parts from Paragon Machine Works came in and they are awesome.  The headstock and rear dropouts are perfect.  Kudos to those guys for making great stuff.


I next laid out the template of the bicycle frame and then the headstock at the correct angle.


I then traced out the frame again on some melamine and there is my metal plate template that will be inserted into the frame.


I was then read to cut out the shape out of metal.  This is were things got fun, i went over to the metal shop and found some scrape 3/8" metal and started cutting it out.  I have to say it is a blast cutting and grinding metal.


So after about 45 minutes or so I can up with this.


After some work with a hand file the burs were gone and it was now time for welding.


Not the best welding job, but it is together.  Tomorrow I will work on the connection a little more and it should be sturdy and ready to be epoxied inside the frame when the material gets here.  Until then its another day of waiting.

- Nick


Friday, February 8, 2013

Logo Design

Hi All,

So just a few more days and all my material should be in my hands.  Though with all this down time I asked my sister ( a wonderful graphic designer ) to come up with a logo for the project, but also some really cool promotion for her.  Here is the logo:
What do you think?

-Nick

Wednesday, February 6, 2013

The Start of Progress

What up y'all,

Thats right two post in one day, you better feel special!  I have something special to announce, all the material that I thought was ordered last week, that wasn't is officially ordered!!!!! That means building can start.  What I did today was basically capture the frame style and look of the bicycle, and laid it down on some cardboard.


Next, I grabbed a friends pretty sweet ride, and did a transfer.  Now when doing this make sure the frame size is the one you need, you could also go to your local bicycle shop and get measured.


After that I went to the wood shop and started making my master transfer, meaning transferring the cardboard trace to a melamine hard copy.  This process started with the cutting of the cardboard trace.


As you can see I made a few changes to the cardboard trace, these are for aesthetic purposes, but also for strength.  I made the last of the cuts and now am ready to transfer onto the melamine hard copy.


Again I traced the cardboard cut out onto the melamine, and will next cut out the hard copy template out.


Here is the bandsaw, its the tool in which most of the bicycle will find its form, but for now it was used to cut out the melamine template.


So here is the hard melamine template for my Plyboo bicycle project.  Though in the beginning stages, its a step in the right direction.

-Nick


Rant, Rant, Rant

Hi All,

As you can see by the post title, it is time for a little ranting, but also a little education on the process of grant related projects.  So when first starting the process of grant writing you go and find a grant that will fund something like a Plyboo bicycle.  Certain grants will fund certain types of projects, here at the University of Southern Indiana the Endeavor! Grant funds all kinds of projects that students need money for.  The Endeavor! Grant Committee is a great help in which they post what the layout of the grant should look like.  I wanted this grant so bad, so I went and also got in contact with previous Endeavor! recipients, I was also lucky enough to have a faculty mentor that was also really into writing grants.   So, I spent about 6 or so months working on this grant to get it perfect, finally submitting the grant and then revising the grant to specific Endeavor! standards.
After receiving the grant the real work begins, working on the project.  The first thing that needs to be done is ordering of material, a lot of my material is ordered outside the state of Indiana.  One thing a lot of people applying for grants do not understand is that the money is not just given to you.  After receiving the grant you then order your material through someone else.  MEANING EVERYTHING IS ORDERED FOR YOU!!!!! This is why grant projects take so much time.  When you have to rely on others, money and then build your project time adds up.  I also advise to stick with hounding people until everything is ordered! This is your project, well my project, so I want it done and if you get a grant you would also.  This is the reason why you all have not seen any building from yours truly.  Well, thats enough ranting, back to building!

-Nick

Monday, February 4, 2013

Design Dilemma

Hi All,

So after a couple of days thinking about a possible design of the bike and what the frame should look like I am still stuck.  As an artist I find myself not wanting to copy other designs in which pops up on google images when searching wooden bicycle.  Though I want and have used them as references, I cannot draw anything that to me doesn't already exist after a few clicks of the mouse.  I guess what I am trying to say or more like ask, is there really a new idea that is really totally "new"?  I just really feel like I am failing if I use another persons design.   I am wanting to design and build a bicycle that someone cannot compare to another.  As the frustration builds, I know I just need to push forward, hopefully the design will come soon.

-Nick

Friday, February 1, 2013

The Waiting Begins

Good evening folks,

Just like the titles explains, it's what I am up to......waiting.  Things are overall ordered and I will probably receive some of the items needed to start the building process sometime next week.  My excitement is building because finally the building process will actually be starting.  A couple things that will need to be done before the parts start arriving: 1. Decided on a finally look ( I have many sketches of what I might want the bicycle to look like ) 2. Construct a templet of the design.  In the next couple of days I will post on the blog a few of the frame designs I have come up with.  Until then it's a waiting game for me.

-Nick